介绍
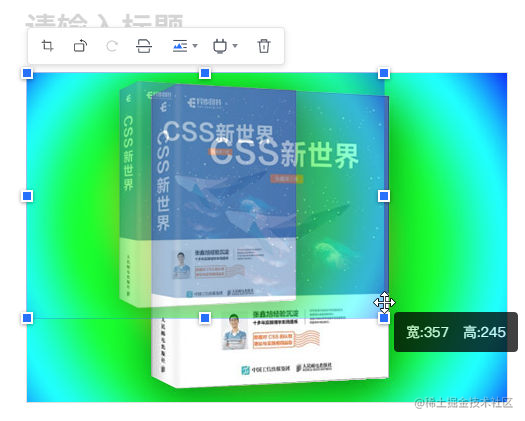
实现下图所示的图片拖拽缩放效果:
- 通常实现方式都是
<img> 元素外面包裹个 DIV,然后定位一些方框框,然后再去拉伸。如果是非编辑器产品,这么实现并没有多大的问题。
- 但是如果是需要实时编辑的产品,IMG 外面还有其他标签,势必会影响很多编辑操作。
- 当然,还有方法就是 JS 定位,拖拽层覆盖在图像上,从技术成本上讲,也是一个不错的实现,但如果页面发生了滚动,或者拖拽很快,拖拽的小方块就有可能跟不上(具体要看你的实现)。
CSS
四个角四个圆圈圈,比较简洁,凡是这种在元素边框(不包括边角)包含规则图形(没有图形也是一种规律)的效果,一定是使用 CSS border-image 属性。
下图是使用处理后的素材配合 border-image 属性实现的效果:
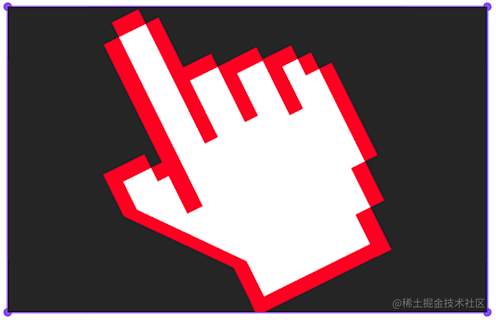
可能图有些小,看不到细节,把边角放大 N 倍看下:

border-image 生成的图形藏在了图像内容的后面。在 Web 中,content 内容的层级是最高的,outline 轮廓、border 边框、background 背景色等都是比图文内容的层级低的。因此,border-image 的图形在 IMG 元素内容的后面,导致边角的拖拽圈圈显示不全。
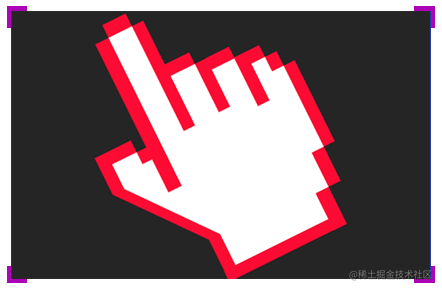
将拖拽图形全部改造为在图像元素的外部,这样就不会有被内容覆盖的问题了:
相关 CSS代码如下:
1
2
3
4
| img.resizable, img[resizable] {
border: 3px solid transparent;
border-image: url(./作者zhangxinxu.svg) 12 / 12px / 0;
}
|
JS 代码
1
2
3
4
5
6
7
8
9
10
11
12
13
14
15
16
17
18
19
20
21
22
23
24
25
26
27
28
29
30
31
32
33
34
35
36
37
38
39
40
41
42
43
44
45
46
47
48
49
50
51
52
53
54
55
56
57
58
59
60
61
62
63
64
65
66
67
68
69
70
71
72
73
74
75
76
77
78
79
80
81
82
83
84
85
86
87
88
89
90
91
92
93
94
95
96
97
98
99
100
101
102
103
104
105
106
107
108
109
110
111
112
113
114
115
116
117
118
119
120
121
122
123
124
125
126
127
128
129
130
131
132
133
134
135
136
137
138
139
140
141
142
143
144
145
146
147
148
149
150
151
152
153
154
155
156
157
158
159
160
161
162
163
164
165
166
167
168
169
170
171
172
173
174
175
176
177
178
179
180
181
182
183
184
185
186
187
188
189
190
| function onlyImageResize(options) {
var doc = document;
var win = window;
var defaults = {
selector: '.resizable, [resizable]',
maxWidth: true,
whenDisabled: function() {
return win.imgResizable === false || doc.imgResizable === false;
},
onFinish: function() {}
};
options = options || {};
var params = {};
for (var key in defaults) {
params[key] = options[key] || defaults[key];
}
var store = {};
var strSelector = params.selector;
var strSelectorImg = strSelector.split(',').map(function(selector) {
return 'img' + selector.trim();
}).join();
var strSelectorActive = strSelector.split(',').map(function(selector) {
return selector.trim() + '.active';
}).join();
var eleStyle = document.createElement('style');
var strSvg = "data:image/svg+xml,%3Csvg width='30' height='30' viewBox='0 0 30 30' fill='none' xmlns='http://www.w3.org/2000/svg'%3E%3Cpath stroke='%23914AFF' d='M2.5 2.5h25v25h-25z'/%3E%3Cpath d='M0 0v12h2V2h10V0H0zM0 30V18h2v10h10v2H0zM30 0H18v2h10v10h2V0zM30 30H18v-2h10V18h2v12z' fill='%23914AFF'/%3E%3C/svg%3E";
eleStyle.innerHTML = strSelectorImg + '{display:inline-block;vertical-align: bottom;font-size:12px;border: 3px solid transparent;margin:-1px;position: relative;-webkit-user-select: none; user-select: none; }' + strSelectorActive + '{border-image: url("' + strSvg + '") 12 / 12px / 0; cursor: default; z-index: 1;}';
document.head.appendChild(eleStyle);
doc.addEventListener('click', function(event) {
var eleTarget = event.target;
if (!eleTarget || !eleTarget.matches) {
return;
}
var eleActive = document.querySelector(strSelectorActive);
if (eleActive && eleActive != eleTarget) {
eleActive.classList.remove('active');
}
if (params.whenDisabled()) {
return;
}
if (eleTarget.matches(strSelector)) {
eleTarget.classList.add('active');
}
});
doc.addEventListener('mousedown', function(event) {
var eleTarget = event.target;
if (eleTarget.matches && eleTarget.matches(strSelectorActive) && eleTarget.style.cursor) {
event.preventDefault();
store.reszing = true;
store.image = eleTarget;
store.clientX = event.clientX;
store.clientY = event.clientY;
store.imageWidth = eleTarget.width || eleTarget.clientWidth;
store.imageHeight = eleTarget.height || eleTarget.clientHeight;
store.position = eleTarget.position;
if (typeof params.maxWidth == 'number') {
store.maxWidth = params.maxWidth;
} else if (params.maxWidth) {
var eleParent = (function(element) {
var step = function(ele) {
var display = getComputedStyle(ele).style;
if (/inline/.test(display)) {
return step(ele.parentElement);
}
return ele;
}
return step(element);
})(eleTarget.parentElement);
if (eleParent) {
store.maxWidth = eleParent.clientWidth - 4;
}
}
}
});
doc.addEventListener('mousemove', function(event) {
var eleTarget = event.target;
if (store.reszing) {
event.preventDefault();
var distanceX = event.clientX - store.clientX;
var distanceY = event.clientY - store.clientY;
var width = 0;
var height = 0;
var scale = 1;
var position = store.position;
if ((position == 'bottom left' || position == 'top right') && distanceX * distanceY < 0) {
if (position == 'top right') {
scale = -1;
}
width = store.imageWidth - distanceX * scale;
height = store.imageHeight + distanceY * scale;
} else if ((position == 'top left' || position == 'bottom right') && distanceX * distanceY > 0) {
if (position == 'bottom right') {
scale = -1;
}
width = store.imageWidth - distanceX * scale;
height = store.imageHeight - distanceY * scale;
}
if (!width && !height) {
return;
}
var imageWidth = 0;
var imageHeight = 0;
var ratio = store.imageWidth / store.imageHeight;
if (Math.abs(distanceX) > Math.abs(distanceY)) {
imageWidth = width;
imageHeight = width / ratio;
} else {
imageHeight = height;
imageWidth = height * ratio;
}
store.image.width = Math.round(imageWidth);
store.image.height = Math.round(imageHeight);
} else if (eleTarget.matches && eleTarget.matches(strSelectorActive)) {
var clientX = event.clientX;
var clientY = event.clientY;
var bounding = eleTarget.getBoundingClientRect();
if ((clientX - bounding.left < 20 && clientY - bounding.bottom > -20) || (clientX - bounding.right > -20 && clientY - bounding.top < 20)) {
eleTarget.style.cursor = 'nesw-resize';
if (clientX - bounding.left < 20) {
eleTarget.position = 'bottom left';
} else {
eleTarget.position = 'top right';
}
} else if ((clientX - bounding.left < 20 && clientY - bounding.top < 20) || (clientX - bounding.right > -20 && clientY - bounding.bottom > -
20)) {
eleTarget.style.cursor = 'nwse-resize';
if (clientX - bounding.left < 20) {
eleTarget.position = 'top left';
} else {
eleTarget.position = 'bottom right';
}
} else {
eleTarget.style.cursor = '';
eleTarget.position = '';
}
}
});
doc.addEventListener('mouseup', function(event) {
if (store.image && store.maxWidth && store.image.width > store.maxWidth) {
var imageWidth = store.maxWidth;
var imageHeight = imageWidth / (store.imageWidth / store.imageHeight);
store.image.width = Math.round(imageWidth);
store.image.height = Math.round(imageHeight);
}
if (store.reszing) {
store.reszing = false;
params.onFinish();
}
});
};
|
使用
在 HTML 页面中直接引入上面 JS 代码就可以使用了:
1
2
3
4
5
| <script>
onlyImageResize({
});
</script>
|
此时,页面中所有设置了类名 .resizable,或者设置了 HTML 属性 resizable 的元素都可以四面拉伸了。
options 为可选参数,包括:
selector
字符串值。默认值是 '.resizable, [resizable]',表示识别为可拉伸图片的选择器。
maxWidth
数值或布尔值。默认是 true,表示有最大宽度限制,最大宽度值是第一个非内联祖先元素的宽度。支持设置为数值,指定最大宽度值。
whenDisabled
函数值,如果返回 true,表示禁用图像的拉伸,如果是 false,则拉伸执行。默认值是:
1
2
3
| function () {
return window.imgResizable === false || document.imgResizable === false;
}
|
表示,如果 window.imgResizable 或者 document.imgResizable 的值是 false,则禁用拉伸。
onFinish
函数值,默认是空函数,拖拽结束的时候触发。
码上掘金
参考资料
- JS之我用单img元素实现了图像resize拉伸效果
- 体验地址:https://zhangxinxu.gitee.io/only-img-resize/
